A New Day of Learning: Decorations
Showing posts with label Decorations. Show all posts

Sunday, February 16, 2014

Masterpiece Display

In my classroom, we have floor to ceiling bulletin boards across the entire back of the room.  This has been a blessing and a curse! It is great to have plenty of space to hang things, but it is hard to make is useful without looking cluttered.  Sometimes, it is hard to fill the large spaces.   Since the beginning of the year, one section of my bulletin board has been completely underutilized, and it was driving me nuts!

A few weeks ago, I was blog hopping and came across this post from Learning in Wonderland.  She used a pad of scrapbook paper, clothespins, and ribbon to make a VERY cute and practical bulletin board to display student work.  When I saw it, I knew I could make my own version very easily!


My Bulletin Board

Here are the steps I followed:

1) Find paper that coordinates with your classroom.  I found mine on Amazon.  I knew that I wanted bright and cheery colors because that is what matches my room and this paper worked perfectly!

2) I scrounged through my scrapbooking ribbon until I found enough ribbon that coordinated with the paper and began tying bows.  I am not going to lie, this step took me FOREVER.  Clearly I have some work to do on my bow tying skills! (Confession:  I had to get tutorials from two different people and it STILL took me forever!) If you have any skill in this area, you will be able to tie smallish bows in a reasonable amount of time!

3) I dug out my trusty glue gun and glued one silver tack to the back of each clothespin.  In my inspiration post, she clipped the clothespin right to the paper.  I chose to glue a tack, so the paper wouldn't accidentally rip when students are changing out their work.  Also, this gives me more flexibility in the placement of the student work.  I could easily move the clothespin down to center the work if it is smaller than an 8.5 x 11 piece of paper.

4) While the glue gun was out, I glued one bow to the front of each clothespin.


5) Next, I decided on the arrangement of my papers.  I decided to not follow a prescribed pattern, but to make it somewhat random.  I  made sure that none of the papers that are the same were too close to each other and that they weren't next to a paper that completely clashed.

6) The next step involved a level and a ruler.  If you are good at eyeballing things, you might not need to be as detailed as this.  I used a level to make sure each paper was straight before I stapled it, and I used a ruler to keep the distance between each paper the same. If you want to eyeball it, try using push pins to put the paper up.  Then you can make adjustments where necessary before stapling.

7)  Lastly, add the clothespins and your student's work.  I let my students hang their own work.  I knew they would want to choose their background color.  They loved picking and it added another layer of pride to their already great work.

What is your favorite way to display student work?


Here are all the supplies you need to create your own display:
(Note: These are Amazon links. Disclaimer)


Saturday, February 8, 2014

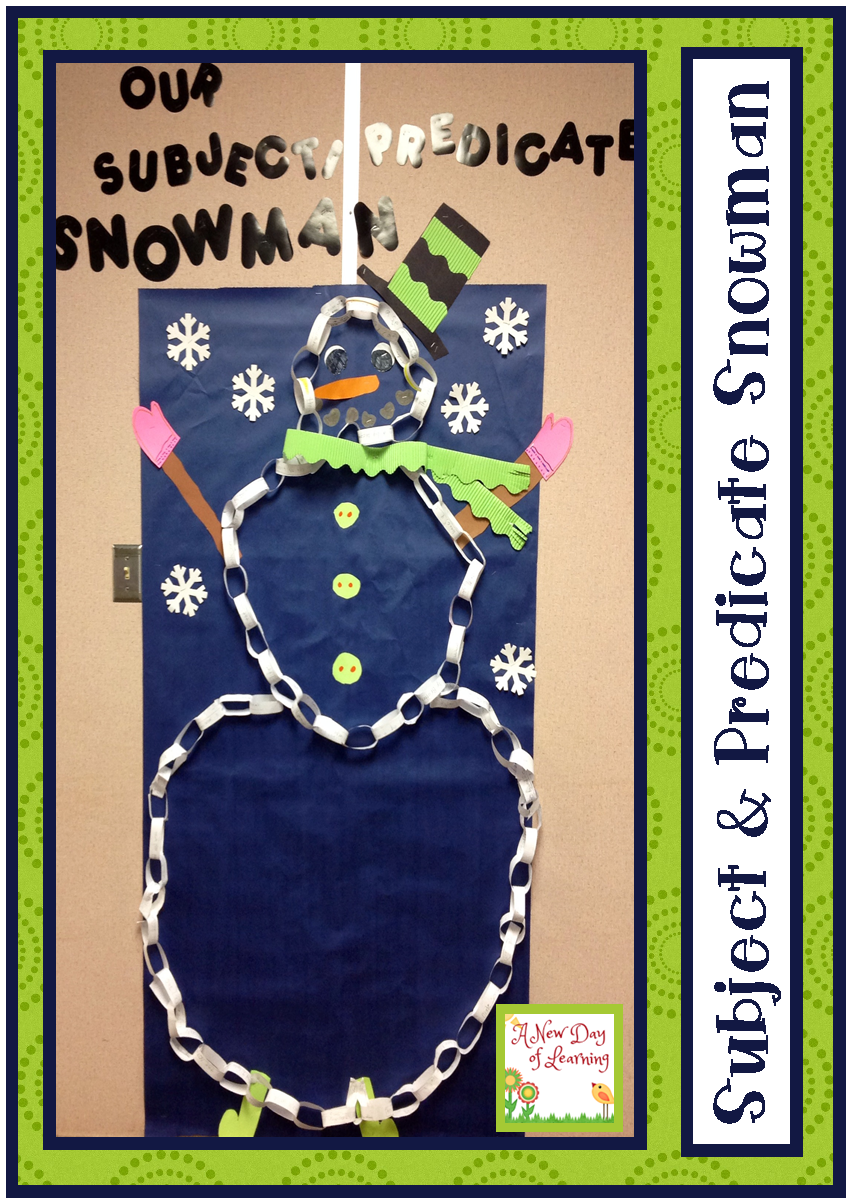
Subject and Predicate Snowman


All of the classes in fourth grade at my school have been working hard on what makes a complete sentence.  We have been studying run-on sentences, sentence fragments and subjects and predicates. As we were wrapping up our study of subjects and predicates, we thought it would be fun to have an end product that the students made together.

We were inspired by this blog post from Owl See You in Third Grade about using sentence strips to make pumpkins  Since, we were studying subject and predicate after it had snowed, we thought that making snowmen might be more appropriate.

We gave each student a couple of sentence strips and had them write a complete sentence. Then we had them circle the subject and underline the predicate in each sentence.  When they were finished, we collected the strips and displayed some of them under the document camera.  The students were so creative when they wrote their sentences.  We laughed for a long time as we reviewed the subject and predicate in each sentence that was displayed.

After we reviewed, we started to link the strips together in to a chain.  Then we stapled the chains in the shape of a snowman onto a bulletin board.  Check out my coworker's display in the hallway.  She had her students decorate it! Didn't it turn out SUPER cute?

http://bit.ly/1bGoZz3 

Click on the picture to get your FREE sentence strip templates to make your own subject and predicate snowman! (Be sure to be logged into your Google account.)

If you don't have a Google account, you can download it from my Teachers Pay Teachers store.

I am linked up this week at

Classroom Freebies Manic MondayFreebie Fridays


What is your favorite way to teach subject and predicate?


Thursday, January 30, 2014

It's My Birthday!


My birthday is this weekend and to celebrate I thought I would give YOU a gift!  All you have to do is visit my Facebook Page and click on the Birthday Freebie Tab! I hope you enjoy it!

https://www.facebook.com/anewdayoflearning


Related Posts Plugin for WordPress, Blogger...
 
Back to the Top